Press "Enter" to skip to content

Month: August 2019

Windows 10 OpenSSH – Configuring Windows Git

This article is the last of a series I’ve written about migrating from using PuTTy on Windows to using the native OpenSSH client now available on Windows 10: you can read the rest of the articles via:

  1. Installation
  2. Storing keys using the SSH Agent
  3. Importing existing keys
  4. Creating a new public/private key pair
  5. Other useful OpenSSH commands
  6. Configuring Windows Git < You are here

If you are using Git for Windows and had previously been using PuTTy, you need to make a small tweak to the configuration for Git to use Windows 10’s OpenSSH client.

If you’ve been getting an error like:

FATAL ERROR: Disconnected: No supported authentication methods available (server sent: publickey)
fatal: Could not read from remote repository.

Please make sure you have the correct access rights
and the repository exists.

when running git clone, but a test such as ssh git@github.com works, then you need to do the following steps.

  1. (Perhaps optional): Uninstall Git if you already have it installed. In theory, this can be done from Window’s “Add or Remove Programs”, but this was playing up for me. If you go into C:\Program Files\Git there should be a unins000.exe executable which will remove Git for you
  2. Install the latest version of Git (I actually uninstalled version 2.21.0.windows.1 and installed 2.23.0.windows.1) and during the setup, you’ll be prompt “Choosing the SSH executable”.
  3. Select “Use (Tortoise)Plink“, but enter in the path to Window’s OpenSSH SSH client: “c:\windows\system32\openssh\ssh.exeSelect (Tortoise)Plink and provide the path c:\windows\system32\openssh\ssh.exe to the Git setup
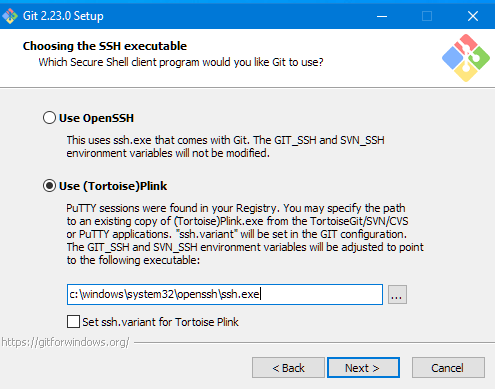
  4. Open a fresh PowerShell window and cloning should work!
    You might get a warning such as “warning: agent returned different signature type ssh-rsa (expected rsa-sha2-512)”, but that’s caused by a mismatch of keys and key types probably from the conversion from PuTTy keys. Generating a new public/private key pair and uploading that public key to Github/Bitbucket will fix that.

Windows 10 OpenSSH – Useful commands

This article is the fifth of a series I’ve written about migrating from using PuTTy on Windows to using the native OpenSSH client now available on Windows 10: you can read the rest of the articles via:

  1. Installation
  2. Storing keys using the SSH Agent
  3. Importing existing keys
  4. Creating a new public/private key pair
  5. Other useful OpenSSH commands < You are here
  6. Configuring Windows Git
Check the keys have been imported to the SSH agent
ssh-add -l

2048 SHA256:9hLEuBRdTBGDmAWxaDXhSwvqYLGVxDVtGiMumz9NUak C:\Users\userName/.ssh/id_rsa (RSA)
Show the public keys in the ssh-agent
ssh-add -L

ssh-rsa AAAAB3Nza...1F53nyTYMlmtcrZZp C:\Users\userName/.ssh/id_rsa
Delete all keys from the ssh-agent
ssh-add -D : hope you kept a backup!
Delete a specific key from the ssh-agent
ssh-add -d C:\Users\userName/.ssh/id_rsa

Windows 10 OpenSSH – Creating a new private/public key pair

This article is the fourth of a series I’ve written about migrating from using PuTTy on Windows to using the native OpenSSH client now available on Windows 10: you can read the rest of the articles via:

  1. Installation
  2. Storing keys using the SSH Agent
  3. Importing existing keys
  4. Creating a new public/private key pair < You are here
  5. Other useful OpenSSH commands
  6. Configuring Windows Git

If you need a new SSH key pair for Github, Bitbucket, AWS, your own SSH server etc, then the easiest way to generate one is from your user’s PowerShell using the command:
ssh-keygen -o
(the -o argument indicates to use the newer OpenSSH format rather than the pre-2014 older PEM format)

This will produce output such as:

ssh-keygen -o
Generating public/private rsa key pair.
Enter file in which to save the key (C:\Users\userName/.ssh/id_rsa):
Enter passphrase (empty for no passphrase):
Enter same passphrase again:
Your identification has been saved in C:\Users\userName/.ssh/id_rsa.
Your public key has been saved in C:\Users\userName/.ssh/id_rsa.pub.
The key fingerprint is:
SHA256:9hLEuBRdTBGDmAWxaDXhSwvqYLGVxDVtGiMumz9NUak userName@machineName
The key's randomart image is:
+---[RSA 2048]----+
|  ...oOOo=*o     |
|  .o.*+@o ..     |
| ..o= & o        |
| .++ E =         |
|.o=   = S        |
|.=   . . o       |
|  o o   . .      |
|   o .   .       |
|    .            |
+----[SHA256]-----+

Don’t forget to add it to the ssh-agent: if you generated this in the default location ending .ssh/id_rsa(.pub) you can use just ssh-add without any parameters to add it

You’ll need to add the public key to whichever remote service you are using – this can be found using either ssh-add -L (if you’ve added it to the Windows10 OpenSSH ssh-agent) or by cat ~/.ssh/id_rsa.pub (the .pub files are “safe for distribution” – but keep the ones without the .pub extension safe!)

OpenSSH Key-gen additional settings

There are plenty of of pages on the internet detailing the various settings the normal Linux/Unix/MacOS ssh-keygen command takes (and the Windows10 Open SSH variant will take most of them), but a quick reference is:

ssh-keygen -o -c
To add a comment (helps identify keys
ssh-keygen -o -b 4096
To generate a 4096 bit key in the default format (currently rsa)
ssh-keygen -o -t ed25519 -a 100 – recommended!
To generate with the ed25519 complexity with 100 rounds of key derivations (may not be supported by all servers).
The key will end in .ssh/id_ed25519, but you can just add it with “ssh-add” as above as it takes into account all the endings.
ssh-keygen -o -t rsa -b 4096 -a 100
To generate an rsa (default) key with 4096 bits and 100 rounds of key derivations
Windows does supports key generation types of “dsa” which is insecure and “esdsa” which has known weaknesses )

Windows 10 OpenSSH: Migrating from PuTTy: Importing existing keys

This article is the third of a series I’ve written about migrating from using PuTTy on Windows to using the native OpenSSH client now available on Windows 10: you can read the rest of the articles via:

  1. Installation
  2. Storing keys using the SSH Agent
  3. Importing existing keys < You are here
  4. Creating a new public/private key pair
  5. Other useful OpenSSH commands
  6. Configuring Windows Git

If you’ve been using SSH for a while, you’ve probably got a variety of private keys in either PuTTy’s own “PPK” format or OpenSSH format. Windows OpenSSH only has support for OpenSSH keys (go figure from the name! 😉 ) and so any PuTTY keys will need converting first.

Converting PuTTy PPK Private Keys to OpenSSH format

  1. Open PuTTyGen
  2. Select “Load an existing private key file” and select your .ppk private key
  3. Select from the menu “Conversions->Export OpenSSH key”
  4. Save the file.
  5. Repeat the previous three steps as necessary for all .ppk files

Adding OpenSSH private keys

In a normal PowerShell window (i.e. not as administrator), just run:
ssh-add C:\Users\userName\.ssh\private_key
Of course, changing the path of the key appropriately!

Windows appears to accept standard private keys and .pem private keys

Windows 10 OpenSSH – Storing keys using the SSH agent

This article is the second of a series I’ve written about migrating from using PuTTy on Windows to using the native OpenSSH client now available on Windows 10: you can read the rest of the articles via:

  1. Installation
  2. Storing keys using the SSH Agent < You are here
  3. Importing existing keys
  4. Creating a new public/private key pair
  5. Other useful OpenSSH commands
  6. Configuring Windows Git

To manage the OpenSSH keys, you need to add them to the ssh-agent (think of it as PuTTY’s Paegant). These keys will then be added to the user’s “Windows registry” and encrypted to their user profile (so, even if the key has an individual password on it, if somebody logins into your machine as user and has access to the registry, then they can access your private keys – if they log in as somebody else, your keys should be safe). This sounds like a security weakness, but is how MacOS and Linux handles keys anyway!

  1. Continuing in the Administration Powershell, we’re now going to start the SSH-agent which makes key management much easier:
    Start-Service ssh-agent
    If you get an error such as

    Start-Service : Service 'OpenSSH Authentication Agent (ssh-agent)' cannot be started due to the following error:
    Cannot start service ssh-agent on computer '.'.
    At line:1 char:1
    + Start-Service ssh-agent
    + ~~~~~~~~~~~~~~~~~~~~~~~
    + CategoryInfo          : OpenError: (System.ServiceProcess.ServiceController:ServiceController) [Start-Service],
    ServiceCommandException
    + FullyQualifiedErrorId : CouldNotStartService,Microsoft.PowerShell.Commands.StartServiceCommand

    Then the service is probably disabled: check with: Get-Service ssh-agent | Select StartType
    If it is disabled, you’ll see:

    StartType
    ---------
    Disabled

    Enable it with
    Get-Service -Name ssh-agent | Set-Service -StartupType Automatic
    (you might need to then start the service again using
    Start-Service ssh-agent
    Setting the service to “Automatic” means next time Windows starts and you login, your keys are automatically available to you!

Security

Once you have added the keys to the ssh-agent, it is then “safe” to delete the local key files. HOWEVER, you are NOT able to export the private keys from the ssh-agent (only show the public keys): so make a backup copy on a removable device (such as a USB key) which you keep in a very safe location in case something happens to your machine!