Press "Enter" to skip to content

Richy's Random Ramblings

Bookmarks from PinBoard February 25, 2017

Bookmarks I’ve added on PinBoard.in recently

Digest powered by RSS Digest

[Techy] Getting cURL to work with Let’s Encrypt: unable to get local issuer certificate error

On my test Debian jessie 8.2 and a staging server Ubuntu trusty 14.04, I had problems being able to use cURL to fetch data from a remote HTTPs site which was secured using a free Let’s Encrypt certificate (this problem manifested itself via both PHP 7 cURL functions and curl directly).

An example of the error is:

curl --verbose https://helloworld.letsencrypt.org/
...
curl: (60) SSL certificate problem: unable to get local issuer certificate
More details here: http://curl.haxx.se/docs/sslcerts.html

To fix this, I found the following steps worked:
sudo apt-get install --reinstall ca-certificates
to ensure you have the latest certificates by your distribution – this might help you, but it didn’t assist me 🙁

So I downloaded the Let’s Encrypt root certificates and forced a rebuild of the certificate store:

sudo curl https://letsencrypt.org/certs/isrgrootx1.pem.txt -o /usr/local/share/ca-certificates/isrgrootx1.crt
sudo curl https://letsencrypt.org/certs/letsencryptauthorityx1.pem.txt -o /usr/local/share/ca-certificates/letsencryptauthorityx1.crt
sudo curl https://letsencrypt.org/certs/letsencryptauthorityx2.pem.txt -o /usr/local/share/ca-certificates/letsencryptauthorityx2.crt
sudo curl https://letsencrypt.org/certs/lets-encrypt-x1-cross-signed.pem.txt -o /usr/local/share/ca-certificates/letsencryptx1.crt
sudo curl https://letsencrypt.org/certs/lets-encrypt-x2-cross-signed.pem.txt -o /usr/local/share/ca-certificates/letsencryptx2.crt
sudo curl https://letsencrypt.org/certs/lets-encrypt-x3-cross-signed.pem.txt -o /usr/local/share/ca-certificates/letsencryptx3.crt
sudo curl https://letsencrypt.org/certs/lets-encrypt-x4-cross-signed.pem.txt -o /usr/local/share/ca-certificates/letsencryptx4.crt
sudo dpkg-reconfigure ca-certificates

and everything worked!

If you are running Java, you may need to also add the certificates to the Java Keytool:
keytool -trustcacerts -keystore $JAVA_HOME/jre/lib/security/cacerts -storepass changeit -noprompt -importcert -file /usr/local/share/ca-certificates/isrgrootx1.crt
keytool -trustcacerts -keystore $JAVA_HOME/jre/lib/security/cacerts -storepass changeit -noprompt -importcert -file /usr/local/share/ca-certificates/letsencryptauthorityx1.crt

(change the storepass password [default of “changeme”] to whatever is relevant to you)

[Personal] Turns out I didn’t actually need a new NAS

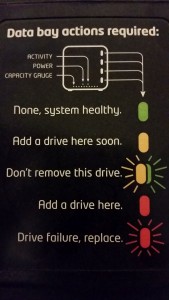
drobo_nas_frontplateOn Friday, I (well, the company), purchased a brand new Synology DS1815+ 8 Bay Desktop NAS (Network Attached Storage) device as the 4-bay Drobo (non-networked) storage device we were using for backups/file storage just seemed to be eating through hard drives – every few months, a red light would appear next to a drive and so we replaced it… The Drobo is quite slow (USB 2 only – so to network it, it has to go from USB 2 to a RaspberryPi to the network: maximum of 20MB/s transfers if we were lucky).

As you can see from the diagram, a “steady red light” indicates “Add A Drive Here”. If the Drobo is fully populated with drives, do you:
a) Take that as an indication the Drobo no longer recognises the drive in that position for whatever reason (not properly inserted, drive failed etc). After all, if the light was blinking, it’ll indicate “Drive failure, replace”
OR
b) The drive is actually fine, but just needs replacing with a higher capacity drive.

For around 6 drive replacements, I’ve thought it was (a) – but it turns out, it is (b)…. So, I could have perhaps saved myself/the company over £1,000 in buying a new NAS and drives for it (okay, I perhaps couldn’t as the Drobo has got 3x4TB drives and 1x3Tb drives in it, so it would have only been a short term storage solution – the Synology does a lot more besides!)… If the “Drive capacity” lights at the bottom of the Drobo flashed/turned red or the drobom status reported “Drive at capacity, replace with *larger* drive” (instead of “Replace drive”), it would have been helpful…

Oh well, at least we have a file store, backup storage solution (with synchronisation to Amazon Glacier), in-house cloud-sync system, media service and a central “single store” for all our files instead of 4 different Drobo volumes….

[Techy] Directly connecting a NAS to a Windows 7 machine

I’ve just purchased a Synology DS1815+ 8 Bay Desktop NAS Enclosure
(Network Attached Storage) device to replace an ageing 4-bay Drobo non-NAS device (well, I made it a NAS via a RaspberryPi) and I’ve started to transfer data across to it.

However, despite the fact it is sitting next to my Windows 7 Professional machine, the data would need to travel out of my GigE network port to the 500Mbps TP-LINK AV500 Two-Port Powerline Adapter that my Win7 machine and the Synology NAS is plugged into, travel down to the router (connected to another Powerline adapter), be routed back up through the electrical system, back through the same Powerline adapter to connect to the Synology’s own GigE Lan port…. Because of that, a transfer of about 500Gb was estimated to take in excess of 14 hours….

So how to speed it up? Well, my PC has 2 LAN Ports and the Synology DS1815+ has 4 LAN ports so I should be able to directly cable them together shouldn’t I? Well, I should – but when I did that, I lost all network connectivity on my machine (I’ve got no idea if the NAS lost it as well as I couldn’t see it’s status). But thanks to the lovely Kat (full disclaimer: I married her 😉 ), there is a solution and it’s got a 14hour+ transfer down to about 1 hour and transferring data over 100MB per second (it would probably be faster, but the Synology is still checking the new disks). So what’s the secret I hear you ask?